> ## Documentation Index
> Fetch the complete documentation index at: https://docs.stac.dev/llms.txt
> Use this file to discover all available pages before exploring further.
# Quickstart
> Get your first Stac app running in under 5 minutes. This guide covers CLI setup, Stac Cloud integration, and building your first server-driven UI.
## Prerequisites
* Flutter SDK: `>=3.35.0`
* Dart SDK: `>=3.0.0 <4.0.0`
## Create a Flutter app (if needed)
If you don't already have a Flutter app, create one and navigate into it:
```bash theme={null}
flutter create stac_demo
cd stac_demo
```
## Sign up
The first thing you'll need to do is sign up for a Stac account. It's free and only takes a few seconds.
To create an account, head over to our Console and sign in with Google: [console.stac.dev](https://console.stac.dev).
## Install Stac CLI
The Stac CLI helps you scaffold projects, manage screens, and deploy to Stac Cloud.
Open your terminal and run:
```bash theme={null}
curl -fsSL https://raw.githubusercontent.com/StacDev/install/main/install.sh | bash
```
Open PowerShell and run:
```bash theme={null}
irm https://raw.githubusercontent.com/StacDev/install/main/install.ps1 | iex
```
Verify installation:
```bash theme={null}
stac --version
```
## Login to Stac
Run the login command. This opens your browser to authenticate with Google.
```bash theme={null}
stac login
```
## Initialize Stac in your project
From your Flutter app directory, initialize Stac:
```bash theme={null}
stac init
```
You'll be prompted to select an option. You can either choose to use an existing project or create a new one.
```bash theme={null}
stac_demo % stac init
###### ######## #### ######
## ## ## ## ## ## ##
## ## ## ## ##
##### ## ######## ##
## ## ## ## ##
## ## ## ## ## ## ##
###### ## ## ## ######
[INFO] Initializing Stac project in this directory:
/Users/StudioProjects/stac_app/stac_demo
? Please select an option: ›
❯ Use an existing project
Create a new project
Don't set up a default project
```
We'll select "Create a new project". Name it `stac demo` and press enter.
```bash theme={null}
✔ Please select an option: · Create a new project
✔ Enter project name: · stac demo
✔ Enter project description (optional): ·
[INFO] Initializing project: stac demo
```
If you are not sure about other options, you can always hit enter to choose the default option.
Stac will now initialize the project and you'll see a message saying
```bash theme={null}
[SUCCESS] ✓ Project initialized successfully!
[INFO] Next steps:
[INFO] 1. Add your Stac widgets definitions to /stac
[INFO] 2. Run "stac build" to convert Dart to JSON
[INFO] 3. Run "stac deploy" to deploy to cloud
```
`stac init` will add the following to your project:
* `stac/hello_world.dart` – A Hello World example widget. All your Stac widgets live in the `stac` folder.
* Adds `stac` to your `pubspec.yaml`.
* Creates `default_stac_options.dart`, which defines your `StacOptions` (e.g., project name and ID).
## Build Stac widgets
Head over to `stac/hello_world.dart` and build the widget. Use the `@StacScreen` annotation to mark the widget as a screen.
```dart theme={null}
import 'package:stac/stac_core.dart';
@StacScreen(screenName: 'hello_world')
StacWidget helloWorld() {
return StacScaffold(
body: StacCenter(child: StacText(data: 'Hello, world!')),
);
}
```
Stac follows Flutter's conventions for building widgets. For example, to use Flutter's `Scaffold`, use the `StacScaffold` widget.
## Deploy Stac widgets
Now that we have our widget built, we can deploy it to Stac Cloud.
```bash theme={null}
stac deploy
```
This finds all widgets in the `stac` folder, builds them, and deploys them to Stac Cloud.
```bash theme={null}
stac_demo % stac deploy
[INFO] Building project before deployment...
[INFO] Building Stac project...
[INFO] Source directory: stac
[INFO] Output directory: stac/.build
[INFO] Found 1 .dart file(s) to process
[INFO] Found 1 @StacScreen annotated function(s) in stac/hello_world.dart
[INFO] ✓ Generated: hello_world.json
[SUCCESS] ✓ Build completed successfully!
[INFO] Processed 1 function(s) and generated JSON files
[INFO] Build completed. Starting deployment...
[INFO] Deploying screens to cloud...
[INFO] Uploading: hello_world.json
[SUCCESS] ✓ Uploaded: hello_world.json
[SUCCESS] ✓ Deployment completed successfully!
[INFO] Deployed 1 file(s)
```
## Initialize Stac
Now that your project is set up, open `main.dart` and initialize Stac.
```dart theme={null}
import 'package:stac_demo/default_stac_options.dart';
import 'package:flutter/material.dart';
import 'package:stac/stac.dart';
void main() async {
await Stac.initialize(options: defaultStacOptions);
runApp(const MyApp());
}
```
Now that Stac is initialized, our app is ready to be dynamic and server-driven.
We can now render our `hello_world` screen using the `stac` widget.
```dart theme={null}
Stac(routeName: 'hello_world'),
```
Here is the full example:
```dart theme={null}
import 'package:example_app/default_stac_options.dart';
import 'package:flutter/material.dart';
import 'package:stac/stac.dart';
void main() async {
await Stac.initialize(options: defaultStacOptions);
runApp(const MyApp());
}
class MyApp extends StatelessWidget {
const MyApp({super.key});
@override
Widget build(BuildContext context) {
return MaterialApp(
title: 'Flutter Demo',
theme: ThemeData(
colorScheme: ColorScheme.fromSeed(seedColor: Colors.deepPurple),
),
home: const Stac(routeName: 'hello_world'),
);
}
}
```
That's it!! With just a few lines of code, your SDUI app is up and running.
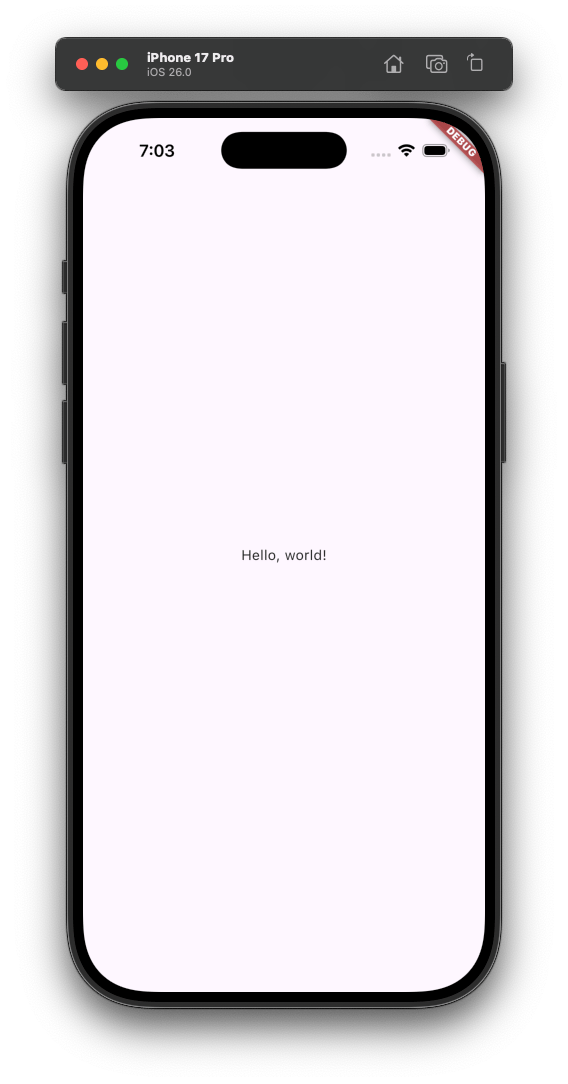 When you make changes in `stac/hello_world.dart`, run `stac deploy` and your app will update instantly — no App Store or Play Store approvals needed.
## Stac Cloud
Open the Stac Cloud dashboard to see your deployed screen: [console.stac.dev](https://console.stac.dev).
When you make changes in `stac/hello_world.dart`, run `stac deploy` and your app will update instantly — no App Store or Play Store approvals needed.
## Stac Cloud
Open the Stac Cloud dashboard to see your deployed screen: [console.stac.dev](https://console.stac.dev).
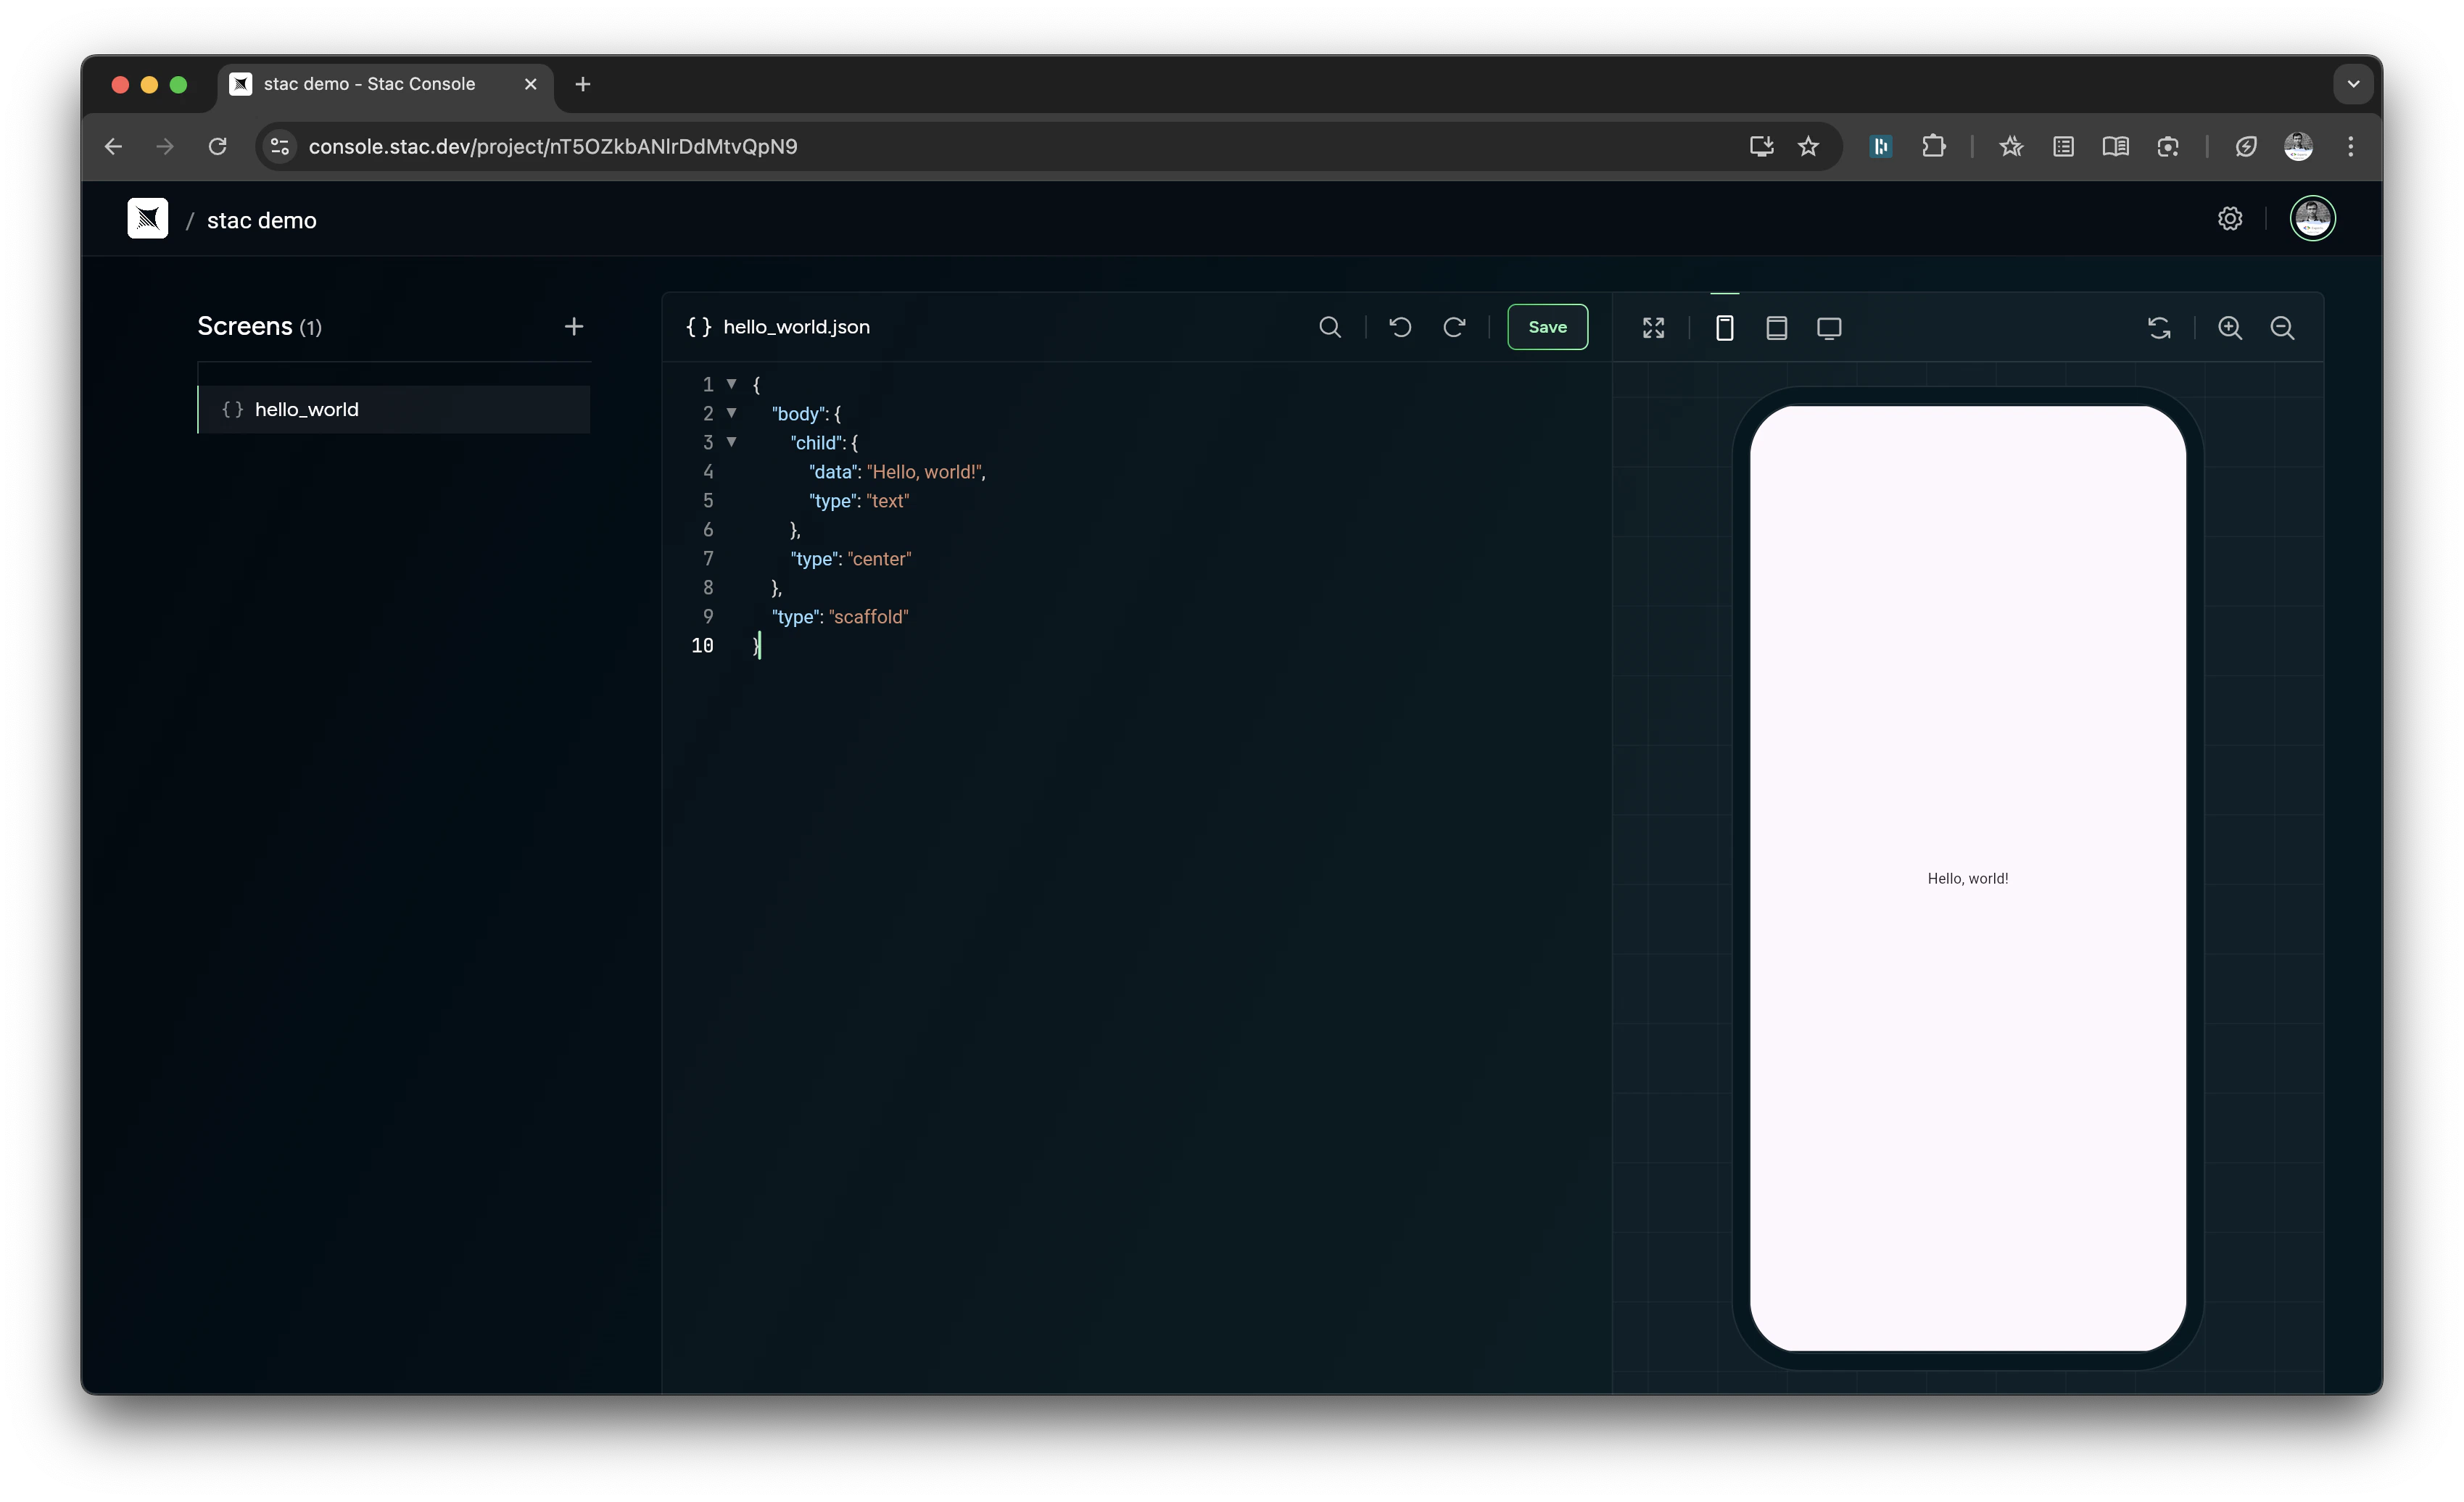 Verification: After deploying, run your app. You should see the `hello_world` screen. In the Console, the screen appears under your project's Screens list.
***
You're all set. Next, explore widgets and actions, or jump into the CLI guide:
* [Widgets](/widgets/align)
* [Actions](/actions/navigate)
* [CLI](/cli)
Need help? Join the community on [Discord](https://discord.com/invite/vTGsVRK86V) or open an issue on [GitHub](https://github.com/StacDev/stac/issues).
Verification: After deploying, run your app. You should see the `hello_world` screen. In the Console, the screen appears under your project's Screens list.
***
You're all set. Next, explore widgets and actions, or jump into the CLI guide:
* [Widgets](/widgets/align)
* [Actions](/actions/navigate)
* [CLI](/cli)
Need help? Join the community on [Discord](https://discord.com/invite/vTGsVRK86V) or open an issue on [GitHub](https://github.com/StacDev/stac/issues).